


Eggplant Gratin, Halloumi Burgers & Sourdough Buns
special meals to start summer well ✨
Allô! 👋
To be honest, I don't have much to say in this newsletter. And seeing as you likely don't have much time to read e-mails, I've decided to keep my mouth shut (or sit on my hands?) and get straight to the good stuff — namely, recipes for sourdough cardamom and cinnamon buns, halloumi burgers, gratin d'aubergines, and more!
If none of these things strike your fancy, don't forget to check out my stories on Instagram. Lots of great stuff is born there, and I often show you exactly how to make a dish. That being said, let's get into it. Hope you had a nice June, and I wish you a lovely month of July!
Stay cool, stay hydrated, stay kind,
👋simone
it's early summer: what to cook? ☀️
In case you missed 'em, here are the newest and most seasonally-appropriate recipes from the site:

a very versatile asparagus quiche recipe
When it comes to asparagus, you’ve just got to seize the season and eat as much as you can before they’re gone again. At least, that’s my philosophy.

cardamom & orange rhubarb cake
Every spring I get a sudden hankering for rhubarb — then inevitably feel compelled to bake this cake.
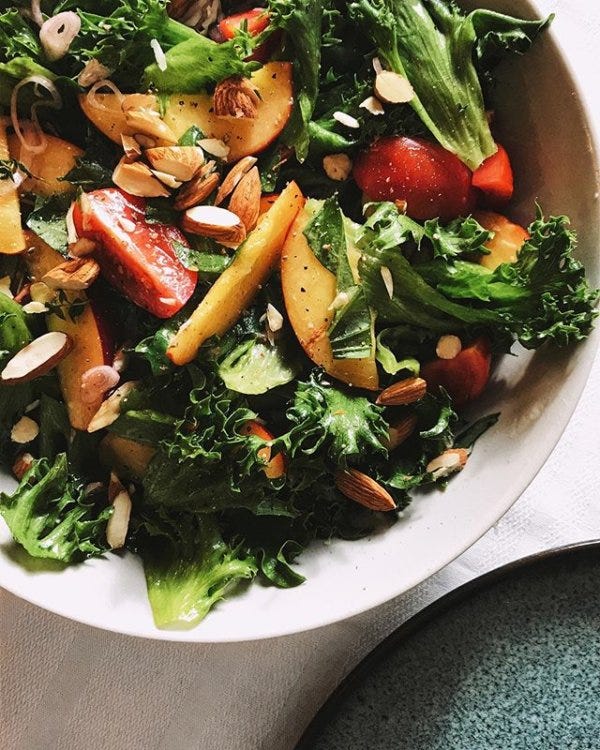
bright & green nectarine salad
It’s probably not a coincidence that the hottest days of the year coincide with the most produce-abundant times. And thank goodness for that.
recipe for a gratin d'aubergines 🍆
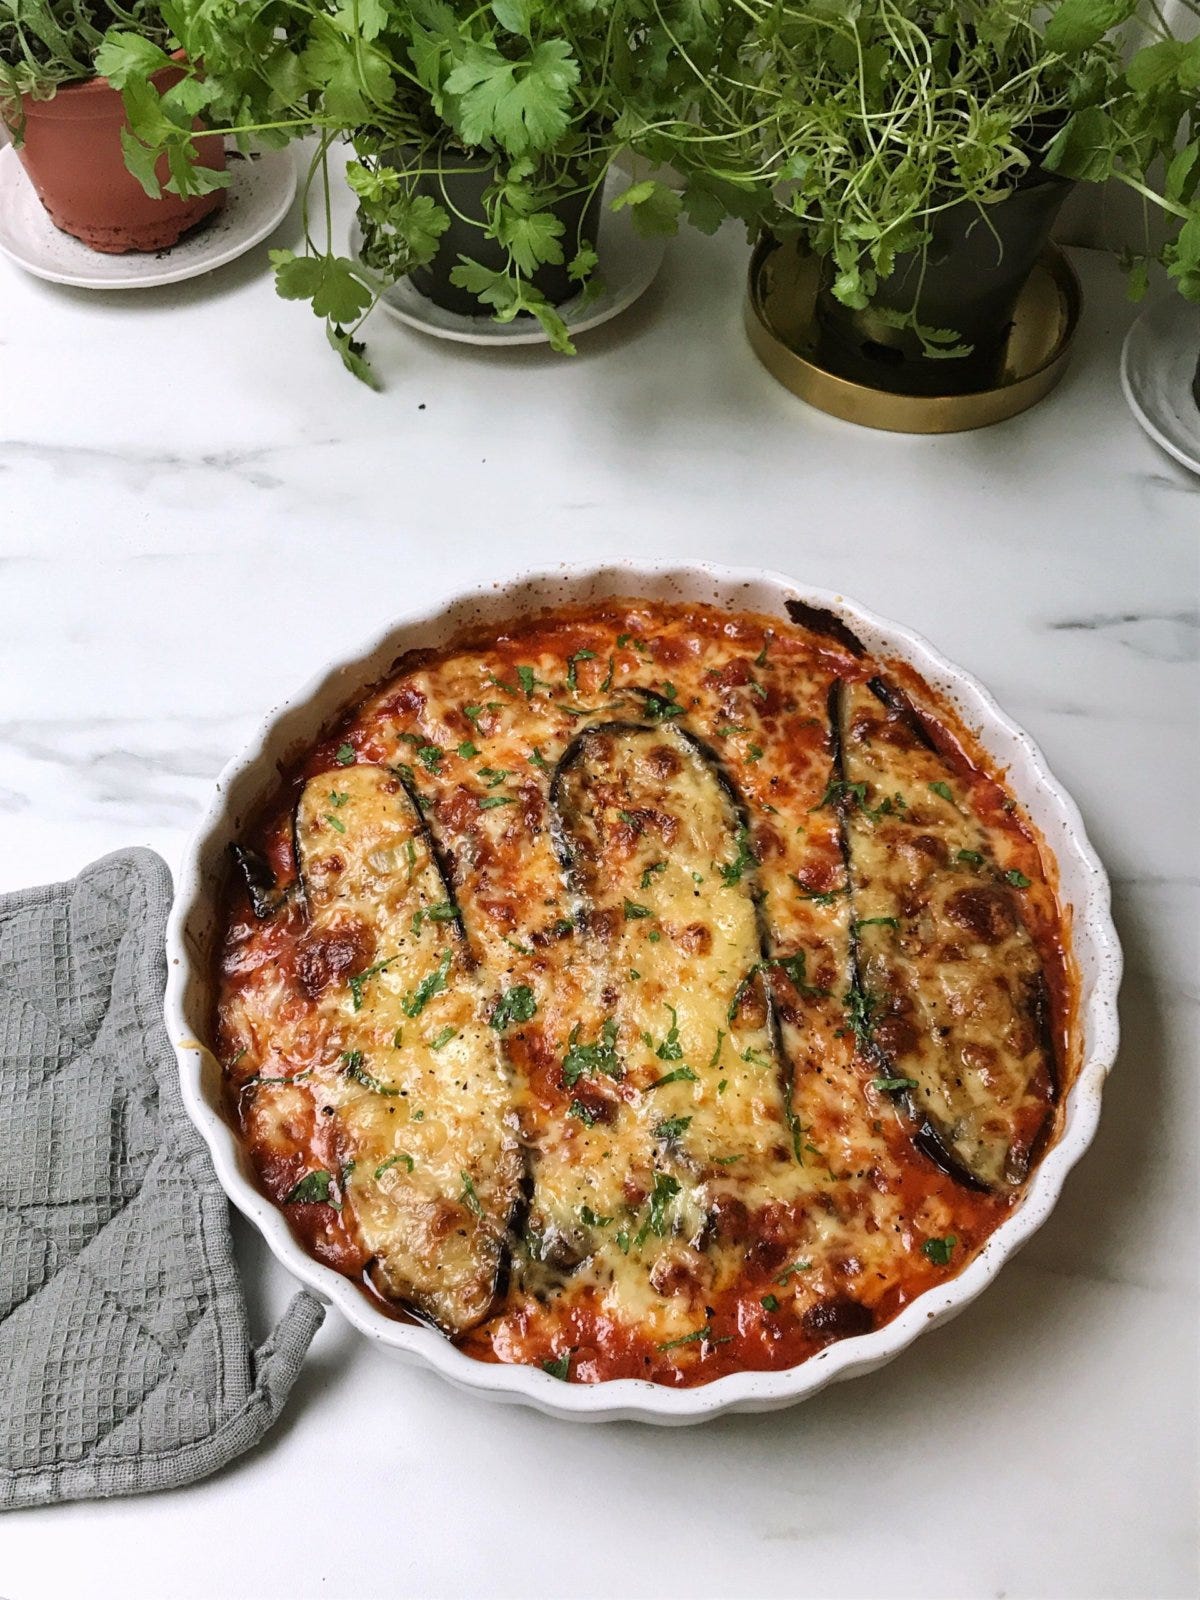
I know I go on and on about eating with the seasons, but I must admit that this isn't a hard-and-fast rule for me (gasp!). The point of seasonal eating is to choose produce that is at its most available, affordable, attractive, accessible, sustainable and flavourful – and sometimes what's in season just isn't those things. So back in April when barely a thing was fresh and the seasonal items in the grocery store were looking both sad and overpriced, I turned to a gorgeous eggplant flown in from Spain.
It brought me so much joy to cook and eat that I knew I had to share it with you guys once I knew eggplants would be more available, affordable, attractive... well, you know, in season. So enjoy this dish now through to the end of summer if you can and, if you can't (or if you just don't like eggplant), know that it's always more than okay to buy what makes the most sense for you and your family.
•••
gratin d'aubergines (i.e. how I call eggplant gratin in French, my mother tongue)
serves 3-6, depending on whether it's enjoyed alone or with a side like a big green salad
INGREDIENTS
• 1 large eggplant, or 2 medium or 3 small ones
• 3-5 cloves of garlic
• 3 shallots
• 6-8 kalamata olives, pitted
• 390g crushed tomatoes (about a box or can's worth)
• fresh parsley
• Jarlsberg, Emmental, or similar cheese in the Swiss cheese family
• 1 ball of fresh mozzarella
• olive oil
• chili flakes
• salt
• pepper
note: the number of garlic cloves and olives depends on their size and how much you like them. also, I used a shallow 26cm ceramic pie plate to bake this dish.
PREPARATION
1. Preheat oven to 220°C/430°F.
2. Slice the eggplant(s) lengthwise into long strips, about ½-1cm thick. Lightly brush with olive oil and sprinkle with salt and pepper on both sides. Bake for 30 minutes or so, flipping halfway, until soft and lightly browned.
3. In the meantime, mince the garlic and shallots and add them to a hot pan (medium-high heat) with a generous amount of olive oil. Season with salt and pepper, and cook while stirring occasionally until translucent, 7-9 minutes. Add in a pinch of chili flakes and the olives, sliced into long strips. Cook for a further 2-3 minutes, then add in the chopped tomatoes + half the tin's worth of water. Season with salt and pepper again and let bubble away until the eggplant is done.
4. When the eggplant and sauce are ready and cooked, pour about half of the sauce into a 26cm/10in round ceramic baking dish (a 28 x 18cm/11x7in rectangular baking dish or equivalent will do too), then layer on half the eggplant in parallel and equidistant strips. Cover evenly but sparingly with fresh chopped parsley. Next, evenly grate over some Jarlsberg (or equivalent cheese) until you've got good coverage but can still see through to the layer below, and repeat with half of the mozzarella, cut or torn into small pieces. Season with a bit of salt and pepper and repeat: sauce, eggplant, parsley, cheeses — except this time your eggplant strips should be rotated 90° so as to be perpendicular to the ones in the first layer.
5. Bake for about 20-25 minutes at the same temperature until the top is golden and browned in spots, but not completely brown.
6. Top with more freshly chopped parsley and let cool for 5 minutes before serving.
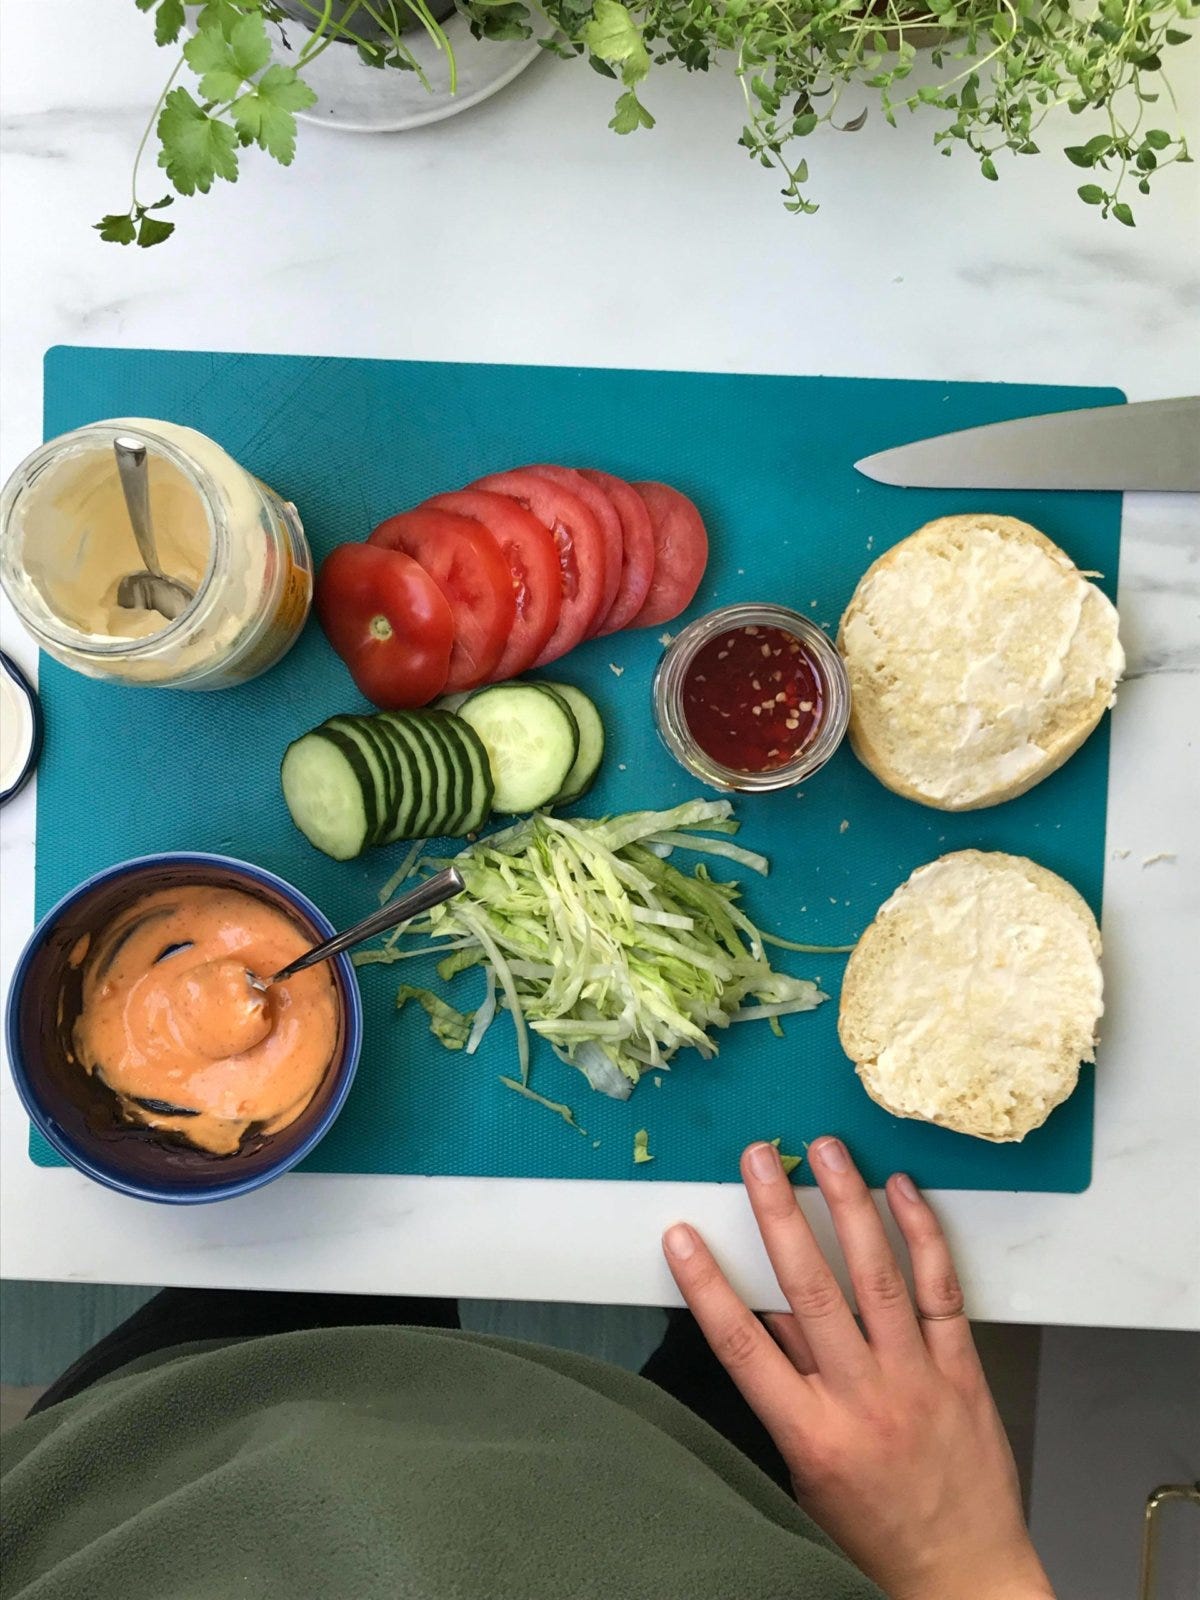
recipe for halloumi burgers (with sweet chili sauce) 🍔
What can I say? These are perfect for eating outside in the golden evening sun, and are best enjoyed in good company.
On a braggy note, I made these for a number of people, including a very much non-vegetarian family member who'd never had a meatless burger before. He not only adored it but also said he didn't miss the meat at all. So, y'know, these aren't just approved by me.
•••
halloumi burgers with a sweet chili sauce
serves as many as you like – ingredients below are for 4
INGREDIENTS & PREPARATION
for the sweet chili sauce
• 4 small red chilis (as spicy or as mild as you like)
• 1 Tbsp runny honey
• 1 lime
• 1 tsp ginger, minced
• 1 tsp garlic, minced
• a pinch of salt
• optional: 2 tsp cornstarch + 1 Tbsp water
1. Remove the seeds from two of the chilis, and slice them all into thin strips or disks.
2. In a small saucepan, combine the chilis, honey, the juice from the lime, the minced garlic and ginger, plus the salt. If you want to thicken the sauce, you can stir 2 teaspoons of cornstarch into a tablespoon of water until dissolved and add it to the pan too.
3. Bring the pot to medium-high heat and let it cook until everything comes to a simmer and the honey bubbles and foams upward. Stir and take off the heat to cool.
4. Use immediately, or store in a jar in the fridge for up to a week.
for the halloumi burgers
• 1 large tomato
• about 1/4 of a large cucumber
• about 1/3 of a head of iceberg lettuce, or similar lettuce
• 4 brioche hamburger bun(s)
• mayonnaise, about 6 Tbsp (+ 1 tsp per bun)
• sriracha, about 4 tsp
• 4 burger-sized “rectangles” of halloumi, about 2cm/1in thick
• a few tablespoons of flour
• a few teaspoons of smoked paprika (1 tsp per Tbsp of flour)
• vegetable oil (I used canola)
• salt
• pepper
1. Slice your tomato, cucumber and lettuce into thin-but-not-too-thin slices across their widths. Set aside.
2. Cut each bun open and spread 1 teaspoon of mayonnaise onto each side, thinly but all the way to the edges.
3. Make a quick sriracha mayonnaise by combining about 6 Tablespoons of mayonnaise with about 4 teaspoons of sriracha. You can adjust this to be more or less spicy according to your tastes.
4. Combine flour and smoked paprika with a good pinch of salt and a few turns of the black pepper mill in a shallow bowl or plate. You want to have enough of the mixture to coat your little halloumi slabs, so this is more easily eyeballed than measured. Toss each piece of halloumi into the dry seasoning until well-but-thinly covered on all sides (you want to cover the edges too).
5. In a dry non-stick pan or cast-iron skillet on medium-high heat, toast your burger buns cut-side down until well-toasted and golden brown. This will only take a few minutes, so keep an eye on them. A tip: when you take them out of the pan, putting them on a cooling rack instead of a plate will help prevent them from sweating.
6. Add vegetable oil to your pan and cook the halloumi “burgers” until golden on each side, flipping only once if you can, and adding a bit more oil if the pan gets dry, about 8-12 minutes.

7. It's assembly time! Prepare each burger in the following order: first, generously spread sriracha mayo on the bottom bun. Top with shredded lettuce, then an even layer of three or four slices of cucumber. Add a teaspoonful or two of sweet chili sauce and place the halloumi on top. Next come two overlapping slices of tomato, another teaspoon or two of sweet chili sauce, and lastly the top burger bun (also slathered in sriracha mayo).
8. Serve with a napkin and eat immediately.
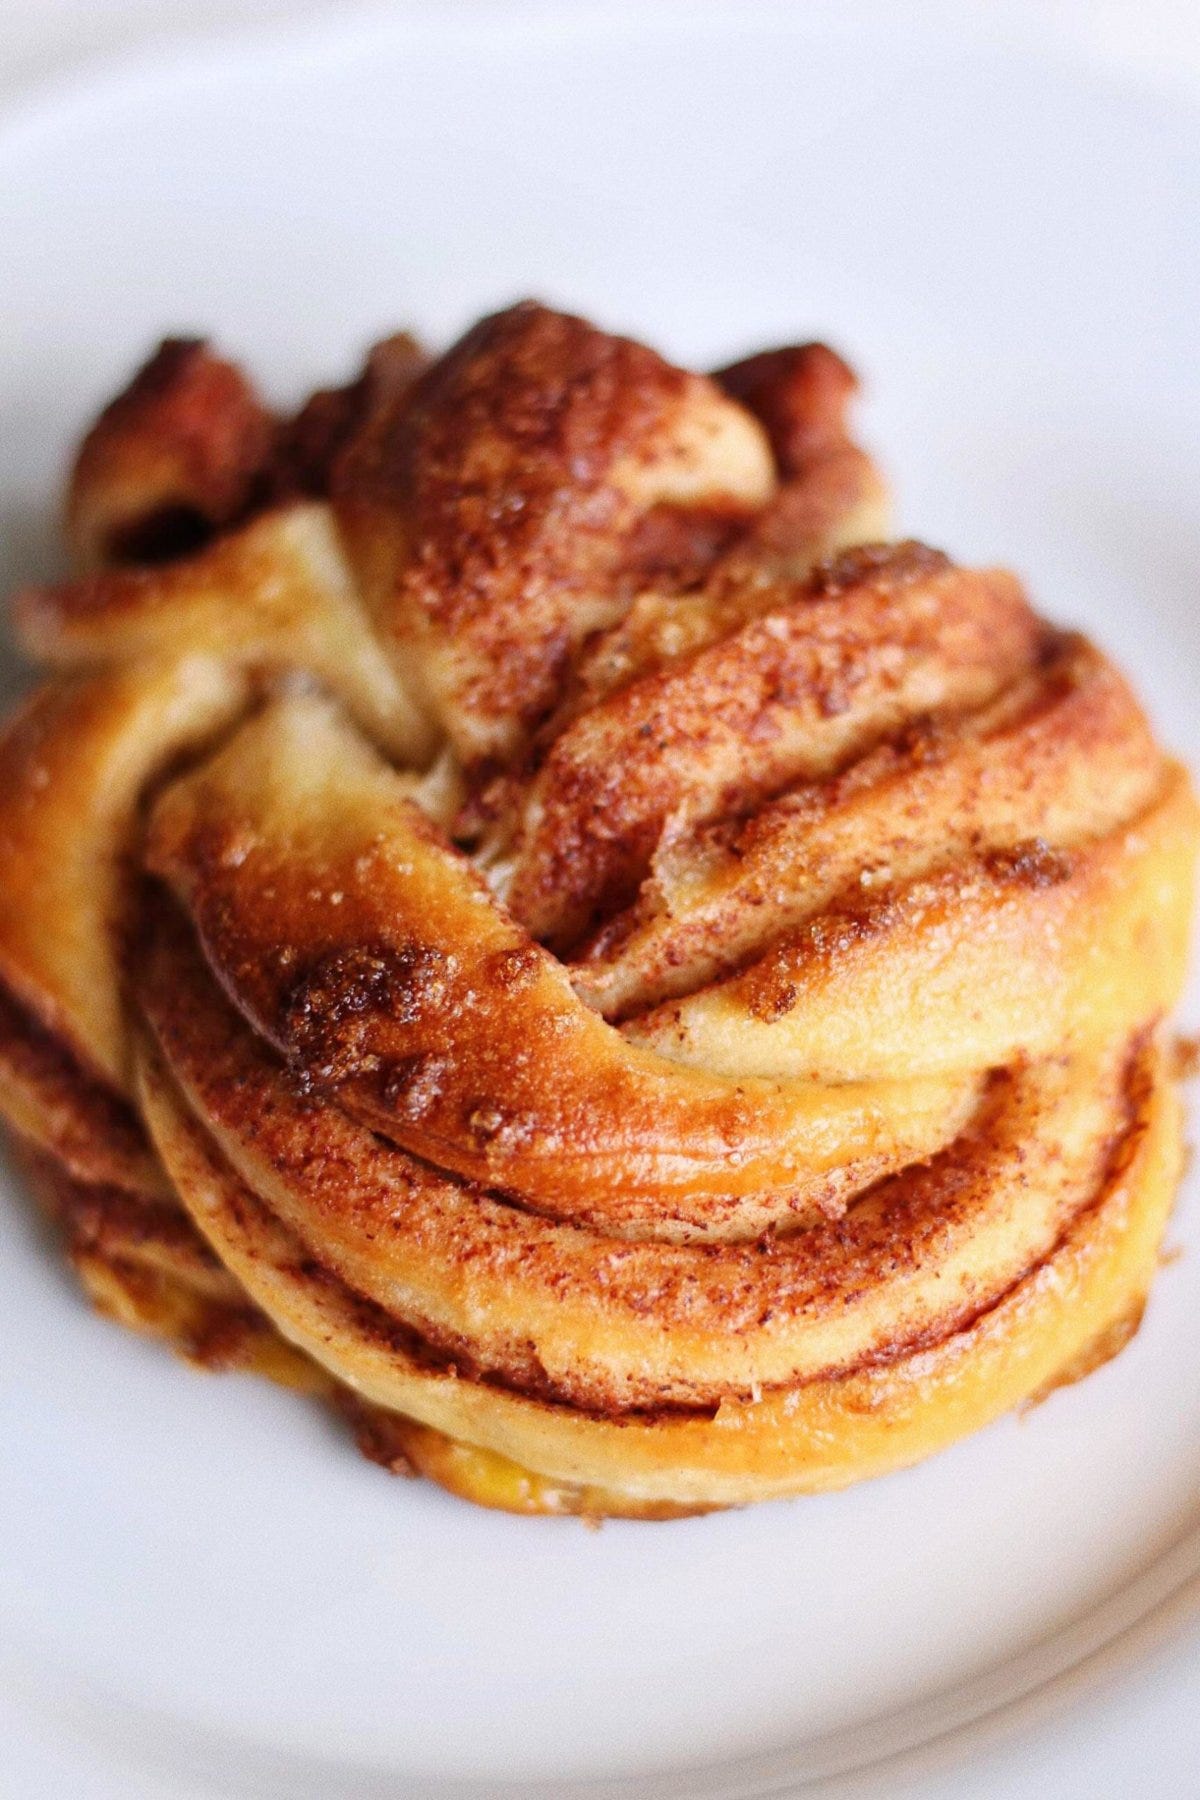
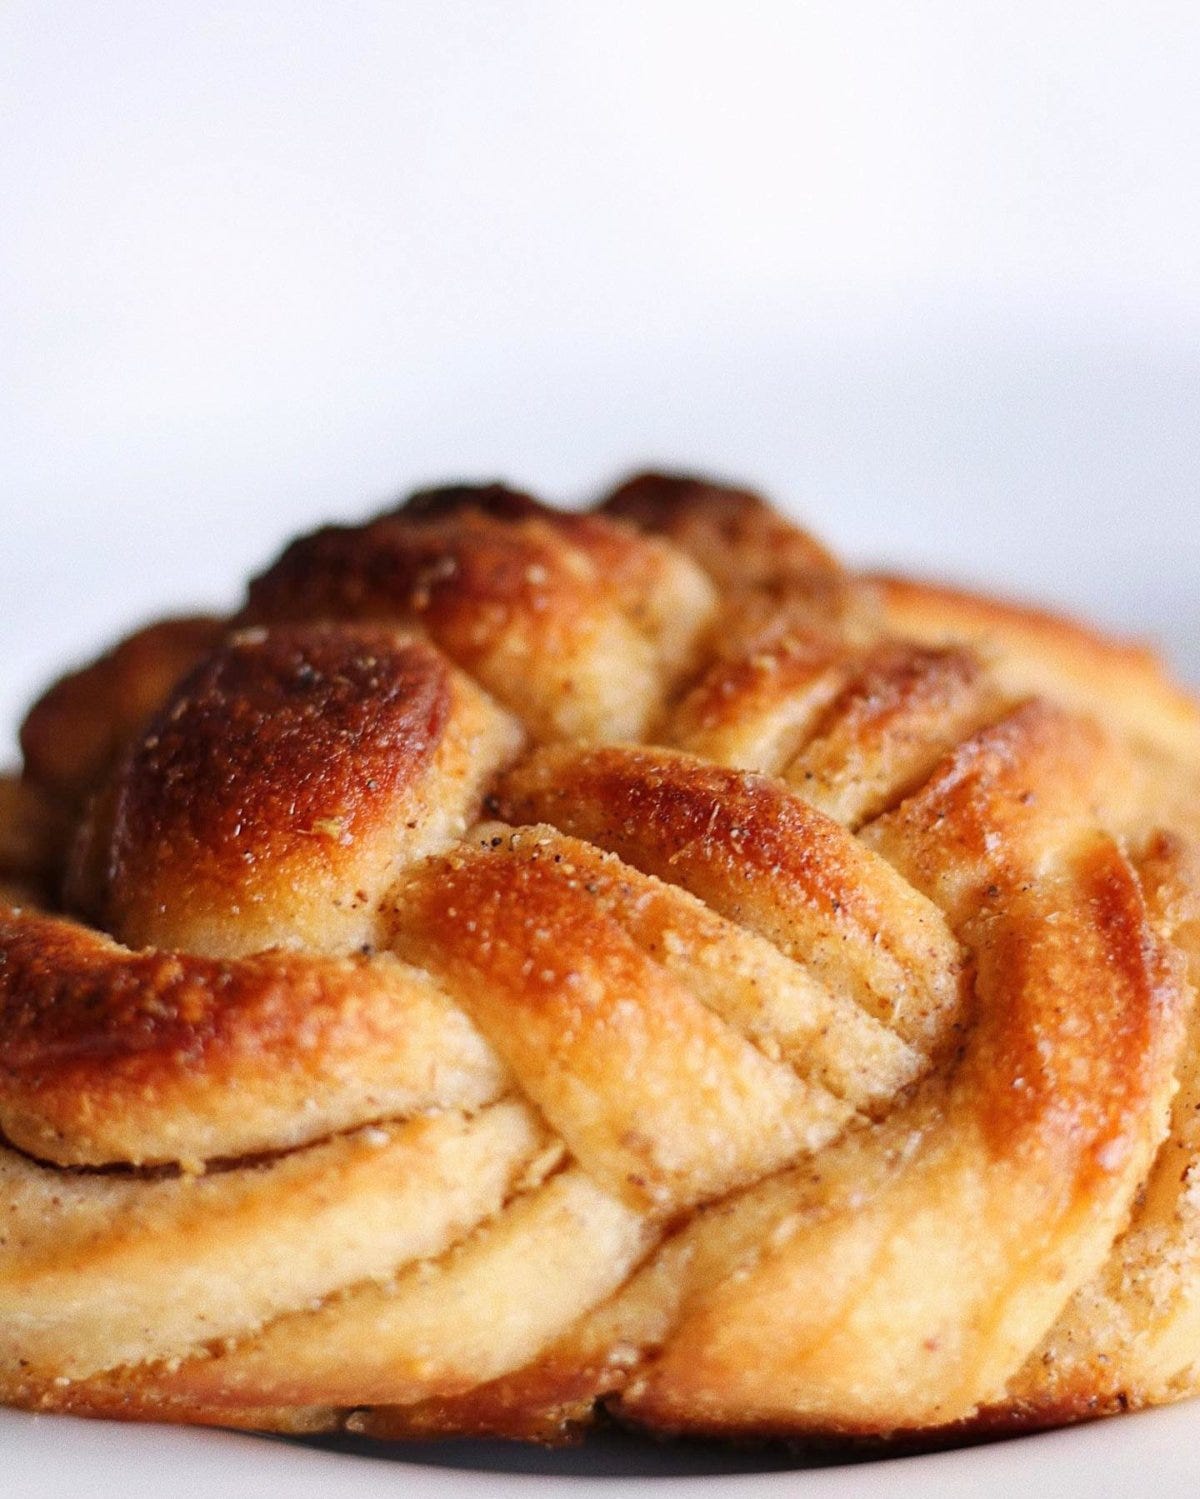
sourdough cardamom braids & cinnamon knots ✨🇸🇪 🇳🇴✨
While these take a fair bit of time from start to finish (you'll have to set aside a day for kneading and shaping, and one for baking and glazing), most of that time is simply used to let the buns do their own thing. The amount of active work involved is surprisingly manageable, plus by following this recipe you'll get two different buns (with two different styles and flavours) out of a single bout of baking!
Full disclosure: this recipe is heavily influenced by this one from Bread by Elise* – the main difference is in the timing of the shaping, and in the addition of the cinnamon knots (whose technique is strongly inspired by this recipe). Gotta give credit where credit is due!
If you don't have a sourdough starter at home, you can follow the recipe from the site and adjust the braiding method, filling and glaze accordingly for the cardamom buns.
*do check out Bread by Elise's work! She makes incredible things with sourdough, and her blog posts are all wonderfully detailed.
•••
sourdough cardamom braids & cinnamon knots
makes 6 of each
INGREDIENTS
for the sweet levain
• 45g sourdough starter
• 45g whole milk, cold
• 45g flour (the same kind you usually feed your starter with)
• 10g white sugar
for the main dough
• 550g all-purpose or bread flour
• 90g white sugar
• 10g salt
• 4g (2 tsp) ground cardamom
• 4g (2 tsp) ground cinnamon
• 250g whole milk, cold
• 2 large eggs
• 145g sweet leaven
• 110g lightly salted or unsalted butter, softened
for the cinnamon filling**
• 50g lightly salted or unsalted butter, softened
• 40g white sugar
• 16g (2 Tbsp) cinnamon
for the cardamom filling**
• 50g lightly salted or unsalted butter, softened
• 40g white sugar
• 16g (2 Tbsp) cardamom
for the cinnamon topping**
• 1 egg, beaten
• 25g brown sugar
for the cardamom glaze**
• 25g brown sugar
• 25g water
• 4g (2 tsp) cardamom
**: if you choose to make just cardamom buns or just cinnamon buns (but still 12 buns total), then you'll want to double these measurements for the chosen bun (and ignore the measurements for the other type of bun). The only exception is for the cinnamon topping, where you'll need to double the sugar but not the egg.
PREPARATION
DAY 1
1. At the start of the day, begin by making your sweet leaven. Combine all the ingredients in a jar, cover loosely with a clean dish towel and put a rubber band around your jar to mark the level of your leaven. Leave at room temperature to double or triple in size (the rubber band is your reference point!), about 3-5 hours.
2. By now it is around midday or early in the afternoon. In a large bowl, starting with dry ingredients and then the wet, mix all the main dough ingredients except the butter until well-combined. Cover loosely with a dampened dish towel and leave to rest for 30 minutes (this is the autolyse, and it helps make your dough easier to manipulate).
3. Knead the dough for 5-10 minutes, then add in the butter progressively as you continue to knead for 15-25 minutes (a machine is useful for this, but I did it all by hand and lived to tell the tale). Keep kneading until you can stretch a small piece of dough into a thin membrane without it tearing (this is called the window-pane test). Congratulations, you've developed your gluten and the dough is prepped for a good rise!
4. Leave the dough to rise in a warm place (in the bowl, under a dampened dish towel) for 2 to 3 hours. This part is called proofing.
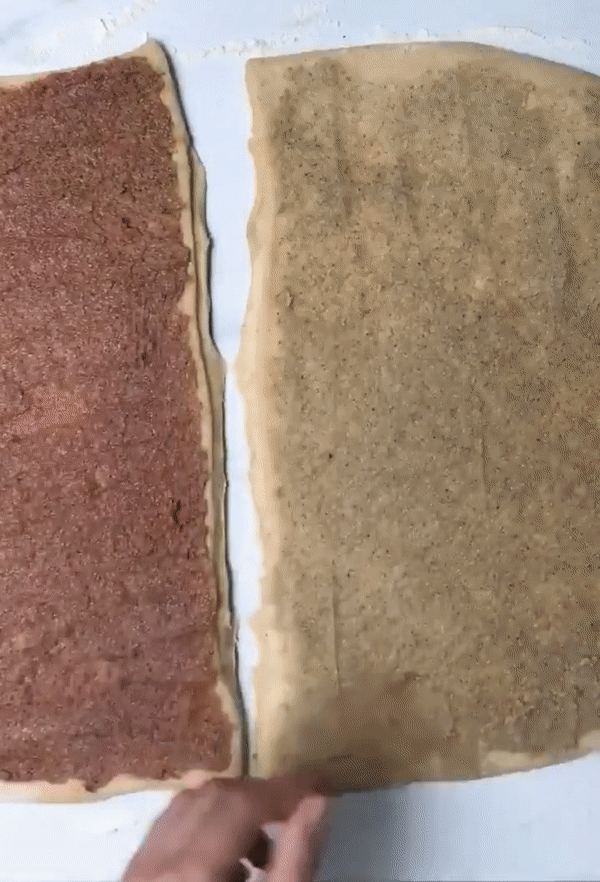
5. While the dough is proofing, make the fillings. In a small bowl, combine the cinnamon filling ingredients until completely smooth and homogeneous. In a second small bowl, do the same for the cardamom filling. Keep at room temperature until needed.
6. It's mid-to-late afternoon now! Lightly sprinkle some flour onto a clean surface and transfer your risen dough onto it. Using a lightly floured rolling pin, roll the dough out into a large rectangle, about 50x30cm (~19x11in). Cut the dough in half widthwise, so you have two rectangles of ~25x30cm (~10x11in). Skip this last part if you choose to make only one kind of bun.
7. Evenly spread the cinnamon filling all the way to the edges of one rectangle and do the same with the cardamom filling on the other rectangle, using a rubber spatula or palette knife.
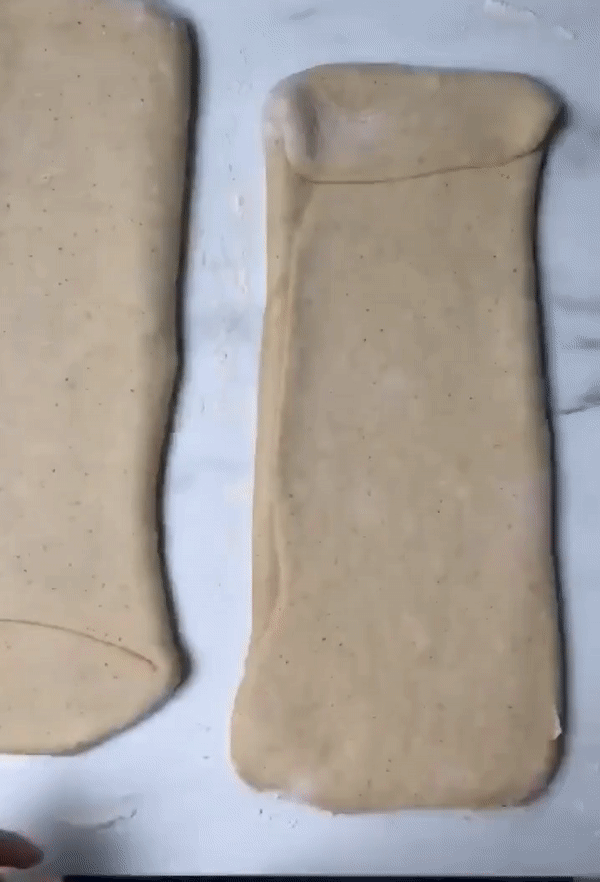
8. Fold the dough in thirds by picking up the top (short) edge and bringing down towards the middle, then bringing the bottom (short) edge up toward the middle and covering the first third. Roll over them lightly afterward with your rolling pin to even them out into neat rectangles.
9. Cut each rectangle across its width into 6 even strips, or 12 total. One by one, cut and shape the strips into buns: for the cinnamon knots, take each piece and cut in half lengthwise, down its middle. Then twist the two strips into a rope and wrap around your three middle fingers, pulling the end of the rope through the hole left by your fingers to form a knot. Place each finished bun on a baking sheet lined with parchment paper or a reusable silicone mat.
For the cardamom braids, take each piece and cut in half lengthwise, down its middle, then cut each piece again to get 4 narrow strips in total. Place two strips parallel to each other, then the other two parallel to each other but perpendicular to the first (it'll kinda look like this: #). Overlap them in a braiding fashion as shown in the GIFs below. When the braid is done, tuck the ends underneath the bun and place on the lined baking sheet.
10. Once all the buns are shaped, it's time for the second rise! Cover the buns loosely with a clean plastic bag (it's actually okay if they dry out a little, so don't worry too much about sealing them in) and place in the refrigerator to proof overnight or longer, 9-24 hours.
DAY 2
11. Bring the buns to room temperature for at least 15 minutes. They should look like they've doubled in size since shaping.
12. Place a rack in the middle of the oven and preheat it to 200°C/400°F. Brush the cinnamon knots with the beaten egg and sprinkle them with the sugar. Bake everything for 13-15 minutes, or until the tops are deeply golden (but before they get brown).

13. While the buns bake, make the glaze for the cardamom buns by combining all the ingredients in a small saucepan and swirling the pot occasionally on medium heat until the sugar has dissolved.
14. Brush the cardamom buns with the glaze as soon as they are out of the oven. Let all the buns cool 5 minutes on the baking sheet before transferring to a rack to cool for a further 15 minutes. All that's left to do now is enjoy!
•••
some final notes
If you don't want to bake all 12 buns in one go, you can pop them into a parchment-lined contained in the freezer after the second rise, and bake them whenever you're ready, as per the recipe, from frozen (just add 2-3 extra minutes to the baking time). These buns are best fresh, but can be stored in an airtight container in the fridge for up to 4 days and reheated for a few seconds in the microwave or a few minutes in the oven before enjoying :)

That's all from me this month!
Happy cooking & happy baking
💛

This was a Substack edit of an archived newsletter. To read the newsletter in its original format, click here.